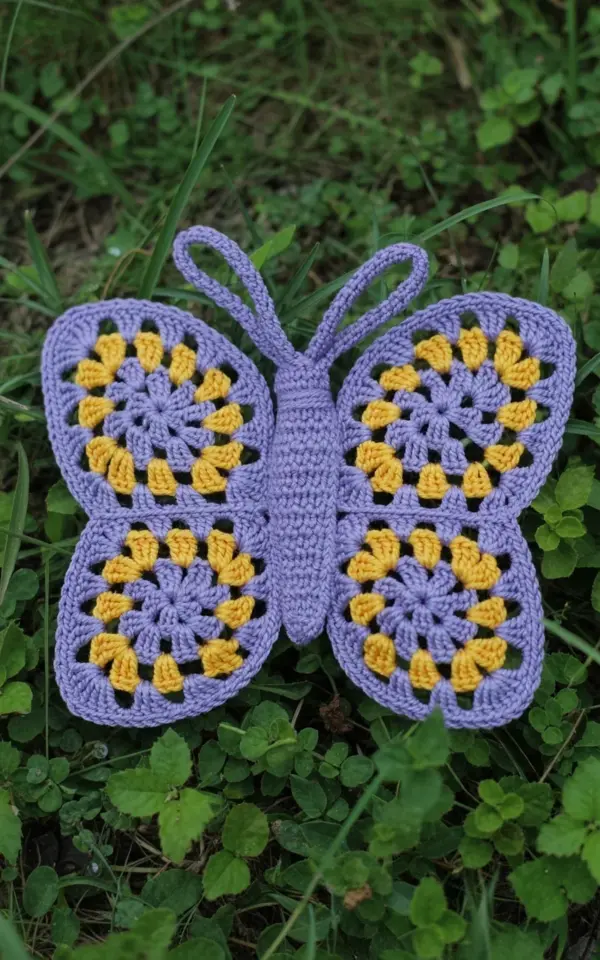
If you’ve been scrolling through Pinterest looking for a cheerful spring project, you might have stumbled onto this crochet butterfly garden decoration. It’s a tiny thing, honestly. Only 6 inches wide and 4 inches tall, made with purple and yellow yarn in a hexagonal granny square pattern. The version in the photo sits on green grass with leaves around it, and those pretty scalloped edges and flower motifs really pop against the darker background. I made mine to hang on a plant hook outside, but it also works as a gift tag or a bag charm.
Why a Granny Square Butterfly Works for Spring Garden Decor
Ok so here’s the thing. A hexagon granny square naturally looks like two wings when you fold it. I didn’t believe it either until I tried. The shape is stable and the stitches hold up outside if you use cotton yarn. Spring decor usually needs bright colors that don’t get lost against green grass or brown dirt. Purple and yellow together? They scream spring without being too loud.
And butterflies are everywhere in the garden anyway. But a handmade one? That adds a personal touch. My neighbor’s kid picked one up last week and asked if it was real. I had to laugh. No, it’s just yarn and a lot of trial and error on my part.
The Yarn and Colors I Used for This Purple and Yellow Butterfly
I used a standard worsted weight acrylic blend. Not fancy. But the colors matter: a deep violet for the main wings and a bright sunflower yellow for the flower motifs and scalloped edges. The photo shows the contrast really well. Purple gives depth, yellow gives pop. If you substitute colors, keep one dark and one light. Trust me on this.
Here’s a quick list of what you’ll need if you want to follow along:
- Worsted weight yarn in purple (about 30 yards) and yellow (about 15 yards)
- A 4.0 mm crochet hook (I prefer metal, but plastic works fine)
- Yarn needle for weaving ends
- Scissors that actually cut, not the dull ones from the junk drawer
- A small stitch marker (or a paperclip, I’ve used both)
That’s it. Not a long list. And honestly, you probably have most of this already if you’ve done any granny squares before.
How a Hexagonal Granny Square Shape Becomes a Butterfly
You start with a magic ring. Or a chain loop if magic rings scare you (they used to scare me). Work double crochet clusters in a hexagon pattern: three double crochets in each space, chain one between clusters. Repeat for four or five rounds depending on your yarn thickness. The butterfly in the photo has about five rounds, which gives it that 6-inch wing span.
But here’s the weird part. After you finish the hexagon, you fold it in half. The two opposite points become the top wings. The other two points become the bottom wings. You stitch the center fold together with a purple yarn tie. That creates the body. I had to redo mine three times because the first two looked like a lumpy potato not a butterfly. Anyway.
One tip: don’t pull the center tie too tight. You want the wings to spread a little. The photo shows a nice open shape, not squished.
Adding Scalloped Edges and Flower Motifs
The scalloped edge is what makes this butterfly look delicate instead of blocky. After the hexagon is done, you work a border in yellow yarn. Single crochet around the whole edge, then in the next round do something like (single crochet, skip one, five double crochets in next stitch, skip one). That creates little shells along each side. The flower motifs are tiny five-petal flowers worked separately and sewn on. I placed two yellow flowers on the top wings and one on the bottom. Symmetrical? Not perfectly. I accidentally sewed one on upside down and it looked fine, so don’t stress.
For the flowers, I used a simple pattern: chain 4, join to make a ring, then work (chain 3, double crochet, chain 3, slip stitch) five times. Each petal takes maybe 30 seconds. Quick. Easy. And they add that little something extra.
Sizing and Finishing Touches for Your Butterfly Decoration
This butterfly is 6 inches wide and 4 inches tall. That’s about the size of your hand. Not a big statement piece, more of a subtle accent. I measured mine after blocking it (yes, I block small projects, it makes a difference). You can make it bigger by adding more rounds to the hexagon, but then it might get floppy. The 6 by 4 size sits nicely on grass or hangs without drooping.
Finishing touches: weave in all ends carefully. The photo shows no loose threads, and that’s key for outdoor use. Wind will catch them. Also, if you plan to put it outside in damp weather, use a waterproof spray meant for fabrics. I learned that after a rainstorm turned my first butterfly into a soggy mess. Not great.
Ways to Display This Crochet Butterfly Garden Decoration
Look, you could just toss it in a drawer. But why would you? The most obvious display is on green grass, like in the photo. It contrasts beautifully. But I also like tying it to a small stick and sticking it in a potted plant. Or sewing a loop on the back and hanging it from a shepherd’s hook. My friend attached one to a gift box with a safety pin (the butterfly, not the box).
You could even make a few in different colors and scatter them around your garden bed. Just avoid putting them where sprinklers hit directly. They’ll last longer. Honestly, they make great conversation starters when people walk by. “Did you crochet that? It looks real.” Yes. Yes I did.
This project took me about an hour and a half from start to finish. Not a huge time commitment. If you’ve never made a hexagon granny square before, expect to frog it once or twice. That’s normal. The important thing is to have fun with the colors and not worry if your scallops aren’t perfectly even. They add character. And a butterfly with character is way better than a perfect one that looks machine-made.
So grab your purple and yellow yarn, make yourself a tiny butterfly, and plop it on the grass. Take a photo. See how it catches the light. That moment is worth every single knot you untangled.
#crochet #butterfly #grannysquare #springdecor #handmade
Leave a Comment