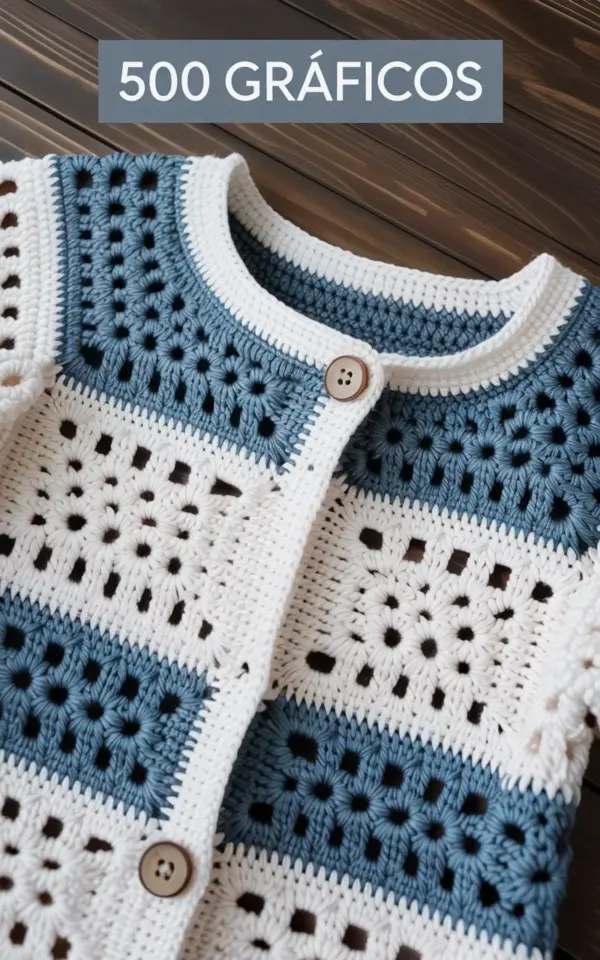
That photo with the cardigan on the dark wood table, the one with the grey banner reading “500 GRÁFICOS” in the background, has been living in my head. It’s not just the pattern that caught my eye. It’s the proof that you don’t need a million colors or expensive yarn to make something that looks genuinely artistic.
This crochet cardigan pattern is a budget project, pure and simple. We are talking about two colors, steel blue and a crisp white, and a whole lot of clever geometric construction. The best part? You probably already have the skills and half the materials to pull this off this weekend.
Materials and Yarn Choices for a Budget Geometric Cardigan
Before you even hook a chain, let’s talk about the hardware. The finished garment in the picture relies heavily on the contrast between the airy white lace sections and the dense, textured steel blue panels. For that to work, you need a yarn that holds its shape and has clear stitch definition.
For a true budget crochet project, I recommend a worsted weight acrylic or a cotton-acrylic blend. Acrylic is forgiving, easy to wash, and usually sits at the lower price point in the craft store. Cotton gives you a crisper look for the lace, but it can get heavy. I used a soft acrylic for mine, and the drape came out just right for a layer over a t-shirt.
Here is my realistic shopping list:
- Main color: Steel blue, about 500 to 600 yards for a medium size.
- Contrast color: White, roughly 400 yards for the lace panels and edging.
- A 5.0 mm (H-8) hook for the main textured stitches.
- Three or four wooden buttons, light birch tones work best for this color scheme.
- A yarn needle, because weaving in ends is the price we pay for beauty.
Honestly, you could swap the blue for a forest green or even a mustard yellow and it would still look fantastic. The formula is what matters, not the exact shade.
Understanding the Geometric Patchwork Layout
Ok so here’s the thing about geometric crochet. It sounds intimidating until you realize it’s just a bunch of smaller squares and rectangles sewn together. The cardigan in the photo is not one giant piece, it’s a grid. Think of it as pixel art, but with yarn.
For this budget geometric crochet pattern, you’ll be making two distinct types of square motifs. The white blocks are the lace elements, full of holes and eyelets. The steel blue blocks are solid, textured, and provide the visual weight. You arrange them in a checkerboard style across the chest, back, and sleeves.
My biggest piece of advice here? Draw it out on graph paper first. Sketch a simple diagram of a cardigan body and color in the squares. It takes ten minutes and saves you an hour of staring at a pile of granny squares wondering which side goes where.
The pattern in the reference photo shows a fairly balanced layout. One blue square, one white square, repeating. You don’t have to be symmetrical, you can place the colors randomly for a more chaotic look, but the balanced grid is what gives that “designed” feel.
The Stitch Stories: Lace vs. Textured Stitches
Let’s get specific about the actual crochet stitches, because this is where the magic happens. The white lace squares in that photo are not a solid fabric with a few holes. That is a true drop-stitch lace, likely a combination of double crochet clusters separated by chains.
If you want to recreate that exact airy look, try a classic mesh pattern. Work a row of double crochets, then in the next row, chain one and skip a stitch before your next double crochet. The holes line up and create a grid. It’s simple, repetitive, and perfect for mindless crochet sessions.
The steel blue textured sections are the real workhorses. They look like they might be a type of bobble stitch or a dense popcorn stitch. To get that dimensional, bumpy surface, you can use a variation of the puff stitch or just work alternate front post and back post double crochets.
I’ll be honest, doing a whole square of bobbles takes a while. But the payoff is real. The fabric is so sturdy and thick that it feels like armor. That solid structure is what balances out the delicate lace and makes the cardigan feel substantial rather than flimsy.
For the edging and borders, you can stick to plain single crochet. It gives a clean, finished line against all that heavy texture.
How to Assemble the Cardigan Panels
This is the step where most people get nervous. I get it. Sewing panels together is the worst. There, I said it. We all pretend crochet is relaxing, but the assembly is a test of patience. Take a breath, grab a cup of coffee, and use the mattress stitch or a simple slip stitch join.
Lay out all your finished squares flat on a table. Arrange them to match your diagram. The cardigan will typically have two front panels, a back panel, and two sleeve sections. Join the shoulders first, then attach the sleeves, and finally sew up the side seams.
A quick tip that changed my life: block your squares before assembling. Soak the pieces in cool water and pin them to the right measurements on a towel. Let them dry completely. This evens out the tension and makes the edges line up perfectly. It’s a boring step, but your seams will look professional instead of wonky.
Pay close attention to where the wooden buttons go. The photo shows them on the front edge, obviously. But because the lace is fragile, you want to reinforce the button band. Crochet a single crochet border around the front opening and work your buttonholes into that border, not the lace itself.
Budget Breakdown and Time Investment
Look, I know the title says budget crochet. So let’s talk numbers. If you are buying yarn new at a big box store, you can get good quality worsted weight skeins for about four to five dollars each. For this project, you will need four to five skeins total, depending on your body size.
That puts your total yarn cost at roughly twenty to twenty-five dollars. Add in the wooden buttons, which cost maybe three bucks for a pack, and you are looking at under thirty dollars for a custom garment. That is less than a pair of fast fashion jeans that will fall apart in three washes.
Now, the time. Not gonna lie, this is not a one-hour make. Crocheting the individual granny squares takes time. If you crochet for one hour a night, expect this to take a week and a half. The textured blue squares are the slowest, so work on those when you are fresh.
Adjusting the Pattern for Your Size
One of the best things about a geometric patchwork cardigan is that sizing is completely flexible. You just add or remove squares. A smaller person might need a 4 by 4 grid for the back, while a taller person needs a 4 by 5 grid.
Before you start making forty squares, measure yourself. Measure your bust, your arm length, and your desired cardigan length. Compare that to the size of your test square. Do the math on paper. In other words, if your squares are five inches wide and you need a forty inch chest, you need eight squares just for the front.
It sounds like a chore, but it kills the frustration later. Crochet is forgiving, but you cannot stretch a cardigan five inches without it looking weird. It is way easier to make two more squares than to rip out a whole row of textured blue yarn. And we both know nobody wants to frog that many bobbles.
Styling and Wearing Your Finished Cardigan
Once you have woven in the ends and attached the buttons, you get to the fun part. This steel blue and white beauty is surprisingly versatile. The neutral colors mean it goes with almost everything in your closet.
Wear it open over a plain white tank top with jeans. The geometric pattern does the heavy lifting, so keep the rest of your outfit simple. It also works as a light summer evening layer over a sundress, or even thrown over a long-sleeved tee in early autumn.
I have a personal rule: I never let a handmade sweater just sit in the drawer. I wear it with stuff. A cardigan like this deserves to be seen, not photographed and folded away. The stiff texture of the blue sections means it holds its shape even when you are moving around.
And honestly, if someone asks you where you bought it, that is the best moment. You get to casually say “I made it” and watch their face do that surprised thing. It never gets old.
Final Thoughts on This Crochet Cardigan Pattern
This project is proof that limitation breeds creativity. Two colors, a cheap hook, and some wooden buttons are all you need to make something that looks like it belongs in a boutique.
The combination of lace and textured stitches keeps the crocheting engaging, and the patchwork assembly makes the art direction a breeze. If you have been scrolling through charts and patterns looking for a sign, let this be it. Grab that steel blue yarn and just start the first square.
Save this idea to your board and give it a shot. I would honestly love to hear how your color choices work out, drop a comment below or tag me when you share your finished cardigan.
Leave a Comment