Why These Crochet Jellyfish Make the Perfect Ocean Decor
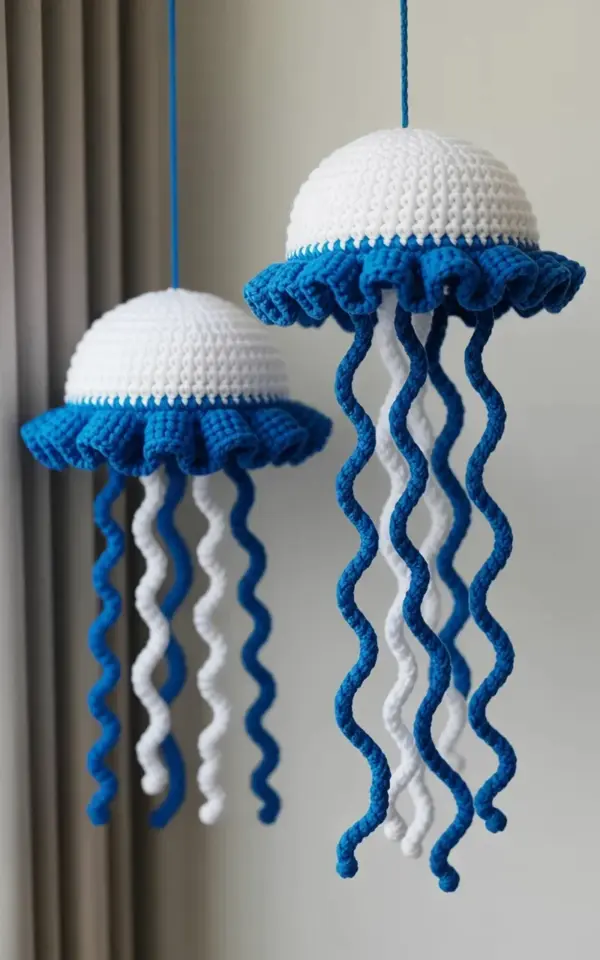
If you are hunting for a soft, whimsical touch for a nursery or a beach themed room, let me tell you about the crochet jellyfish ocean decor I just finished. Using white and royal blue yarn, I made two hanging jellyfish. Honestly, the ruffled edges came out even better than I imagined. The one on the left has a white umbrella with blue ruffles and short, twisting tentacles. The one on the right? Longer tentacles that spiral down like elegant ribbons. Both hang from simple strings against a light gray wall. I am obsessed. And I think you will be too.
Here is the thing: you do not need to be a pro crocheter to make these. Look, I taught myself from YouTube videos two years ago. If I can do it, you can do it. Let me walk you through everything from yarn choice to final hanging.
What You Need: Supplies for a Beginner Friendly Crochet Jellyfish Pattern
Ok so, before you start, gather these items. I am listing exactly what I used. No fancy tools. Just basics.
- Yarn: worsted weight (4) in white and royal blue. I used a soft acrylic blend because it holds shape without being stiff. Cotton also works, but it is less forgiving on the ruffles.
- Crochet hook: size G (4.0 mm) for the main body. If you crochet loosely, size down to F (3.75 mm). Tight stitches? Go up to H (5.0 mm).
- Fiberfill stuffing: a small handful for the dome. Don’t overstuff – you want a slight squish, not a rock.
- Yarn needle and scissors. The needle should have a big eye for threading thick yarn.
- Fishing line or thin thread for hanging. I used clear fishing line. It makes the jellyfish look like they float.
That is it. Not gonna lie, I used to think you needed twenty different hooks. Nope. One hook, two colors, and a bit of patience. Oh, and a cup of coffee. I spilled mine while making the second jellyfish and had to redo an entire row of tentacles. The yarn smelled like a latte for a week. Anyway, learn from my mistake: keep your drink far from your work.
Step by Step: How to Crochet the White Dome and Ruffled Edges
Start with the white yarn. Make a magic ring (or chain 4 and slip stitch to form a circle). Work single crochet increases in rounds until your circle is about 3.5 inches across. That creates the umbrella top. For the dome, do not increase too fast – you want a gentle curve, not a flat pancake.
Here is where the magic happens: switch to royal blue yarn for the ruffled edge. Instead of plain single crochet, work two or three double crochet stitches into the same stitch, then skip one stitch. Repeat around. The extra stitches create that wavy, frilly look. I love how the photo shows the blue ruffles contrasting with the white body – it really pops against a light gray wall.
Stop when the dome is about 2 inches tall. Weave in the ends, but leave a long tail for attaching the tentacles later. And remember: do not stuff it yet. You want to insert the stuffing after the tentacles are attached, so the weight balances.
Making the Tentacles: White and Blue Yarn Spiral Techniques
The tentacles are the soul of a jellyfish. For the short, twisty ones (like on the left jellyfish in the photo), chain about 30 stitches in royal blue. Then work two half double crochet stitches into each chain. That makes the chain curl on itself. For longer, flowing tentacles (like the right jellyfish with elegant spirals), chain 50 or 60 stitches. Then do the same half double crochet increase. The longer the chain, the deeper the spiral.
I made eight tentacles per jellyfish. Four short, four long. You can mix white and blue too – the picture shows blue tentacles only, but I tried a white-and-blue striped tentacle once. Looked like a candy cane underwater. Cute, but not my style for ocean decor.
Pro tip: when you attach them, space them evenly around the rim. Use the yarn needle to sew each tentacle onto the inside of the dome. Knot tightly. Then add a tiny bit of stuffing and close the bottom with a running stitch. That way the tentacles hang downward freely.
How to Hang Your Crochet Jellyfish (and Get That Perfect Float)
You want your jellyfish to look like they are drifting through water, not stuck to the ceiling. Cut a piece of fishing line about 12 inches long. Thread it through the top center of the dome using a yarn needle. Tie a knot inside. Then tie the other end to a small ring or directly to a hook on the wall.
For the photo, I hung both from clear thumbtacks pressed into the drywall. The light gray background makes the white and blue pop. If you hang them in a nursery, consider a mobile. Attach three or four jellyfish to a wooden hoop at different lengths. It looks like a tiny ocean parade.
One weird thing I discovered: if your line is too long, the jellyfish spins slowly. That is actually kind of mesmerizing. But if you want them to face forward, use two attachment points (one on each side of the dome). I did not do that for these – I like the slight rotation.
Ways to Customize Your Ocean Home Decor with Yarn Art
This pattern is super flexible. Swap the royal blue for teal or seafoam green. Use variegated yarn for a rainbow jellyfish. Or add beads to the tentacle ends – just thread them onto the yarn before crocheting the chain. They add weight and a little sparkle.
For a beach themed room, consider making a school of these in different sizes. Use thinner yarn and a smaller hook for baby jellyfish. Oh, and if you are worried about safety for kids, skip the beads. Use only yarn and fiberfill. The acrylic is washable on gentle cycle.
I made one as a gift for my niece’s nursery. She named it “Bloop.” Honestly, that alone made the hours of crocheting worth it.
Common Beginner Mistakes (And How to Avoid Them)
First big mistake: using a hook that is too small. If your ruffles look stiff and flat, you need a larger hook or more stitches. Second mistake: pulling the chain too tight for the tentacles. Loose and even chains give better spirals. Third: forgetting to weave in ends before final assembly. Nothing is worse than finishing a jellyfish and finding a stray white yarn tail poking out of the blue ruffles.
But you know what? Even if you make these mistakes, the jellyfish will still look cute. They are forgiving little creatures. And no one examines a handmade craft for perfection – they just see the love.
So grab your white and blue yarn. Make a few. Hang them up. Take a photo against your wall. Then tell me how it goes. I love seeing other people’s yarn art.
#crochetjellyfish #oceanhomedecor #handmadecrafts #yarnart #crochetpatterns
Leave a Comment