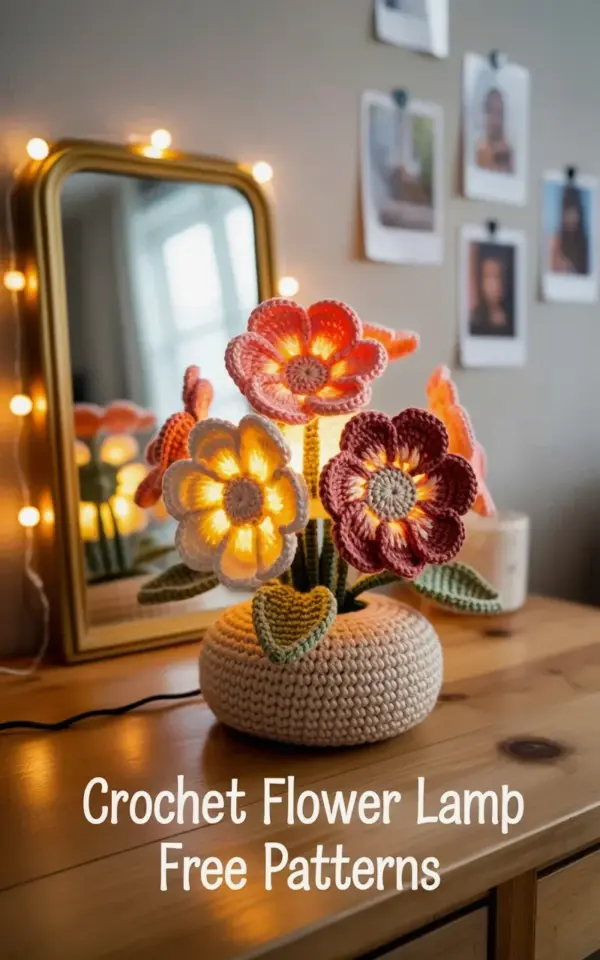
I made this crochet flower lamp using scrap yarn and a string light set, and honestly, it turned out way cuter than anything I could have bought at the store. The coral, yellow, and burgundy blooms glow warmly over my wooden table, and that woven base is just a simple granny circle. Soft lighting without the price tag? Yes please. I am not gonna lie, I expected it to look a little wonky. But the moment I plugged in those lights and saw the shadows flickering across the gold-framed mirror in the background? I was sold. If you want a piece that looks fancy but costs almost nothing, this is your project.
Why You Should Make a Crochet Flower Lamp Instead of Buying One
Store-bought lamps with a handmade look often cost forty, fifty, even eighty dollars. And half the time, they are made from synthetic materials that feel like plastic. Ok so, I bought a string of twenty LED fairy lights for six bucks at a discount store. The yarn? Scraps from old projects that were just sitting in a basket under my bed. A ball of coral from a beanie I never finished, some yellow left over from a baby blanket, a little burgundy from a scarf. Green for the stems. That is pretty much it.
Here is the thing: when you make it yourself, you get to choose the exact colors. You can match your existing decor. You can make the flowers as big or as small as you want. And if a bulb burns out, you just swap the string. You cannot do that with a store lamp. They do not sell a flower that screws off. So yeah, budget wins. But also, control wins. I like having control over the weird little details.
Sourcing Scrap Yarn and Budget String Lights for Your Handmade Lamp
You do not need a fancy craft store trip. Look, I raided my own stash and found four different colors. If you do not have scraps, ask a friend who crochets. We all have bags of half-used skeins we are never going to touch again. Or check a thrift store. Sometimes you can find a giant bag of mixed yarn for three dollars. Just make sure it is a light weight, maybe a DK or worsted. Bulky yarn makes the flowers too heavy and they droop.
For the lights, you want a copper wire string, not a thick plastic cord. The copper wire is flexible and you can weave it right through your stitches. It also holds its shape if you want to curl a stem. I got mine at a dollar store, but honestly, any cheap fairy light set with a battery pack works. Avoid anything that gets hot. LED only. Warm white is better than cool white because it makes the yellow and coral glow instead of looking washed out. I learned that the hard way after buying cool white once. The burgundy looked brown. Gross.
- Yarn leftovers in at least two colors plus green for leaves. I used coral, yellow, burgundy, and a sage green.
- A 3.5mm or 4mm hook. Whatever you have lying around. I used a 3.5 because I wanted tight stitches for the base.
- One string of 20 to 50 LED fairy lights on copper wire. Battery operated is easiest because you are not tethered to an outlet.
- A tapestry needle for weaving ends. Do not skip this part. Loose ends look messy when the lamp is glowing.
- Optional but nice: a small wooden ring for the base to sit inside. I did not use one, but some people like the structure.
How to Crochet Simple Flowers That Actually Glow
I used a basic five-petal flower pattern. Chain four, slip stitch to form a ring. Then single crochet around the ring, but here is the trick: you make each petal by chaining two, doing three double crochets, then chaining two again before slip stitching back into the ring. It gives a rounded petal that catches the light. Do that five times. Fasten off. That is one flower. It takes maybe six minutes. By the time I finished watching one episode of a show, I had eight flowers done.
Now, the glowing part. Before you close up the center of each flower, you need to pull one of the little LED bulbs up through the ring. I know, it sounds fiddly. But copper wire bends easily. You just push the bulb through the center hole of the flower, then tighten the yarn around it. The bulb sits right in the middle of the petals. When you turn the lamp on, the light shines out through the yarn threads. It is soft, not harsh. Like a tiny lantern wrapped in yarn.
One thing nobody tells you: if you use dark colors like burgundy, the light will be dimmer in those flowers. That is okay. It adds contrast. The yellow ones glow like little suns. The coral ones are warm and pinkish. The burgundy ones are moody and deep. It looks intentional even if you did not plan it. So embrace the variation. It looks like a real bouquet, not a factory product.
Building the Woven Base With a Simple Granny Circle
For the base, I crocheted a flat circle using the same technique as a granny square but in the round. Start with a magic ring, chain three, then do eleven double crochets into the ring. Pull it tight. Slip stitch to join. Then for round two, chain three and double crochet twice into each stitch. Keep increasing until the circle is about six inches across. Mine ended up being seven rounds. The natural beige color of the yarn I used gives it a nice neutral base that does not compete with the bright flowers.
I did not block it or anything. I just let it lie flat on the table. It is not perfectly round, and honestly, that is part of the charm. A handmade lamp should look handmade. If it looked machine-made, what would be the point? The base sits under my string of lights, and the battery pack tucks underneath. You cannot see it from the front. I just hide it behind a flower. Here is a weird little aside: I used a small piece of velcro to stick the battery pack to the underside of the base. It keeps it from sliding around when I move the lamp. Works perfectly.
Arranging the Flowers for a Natural, Gallery Wall Vibe
You want the flowers to look like they are growing, not like they are glued on randomly. I put the tallest ones in the back, which is actually the middle of the lamp base if you think about it. The copper wire stems let me bend each flower forward or back. I angled some toward the gold-framed mirror that hangs on my wall, because I wanted the reflection to double the glow. In the photo, you can see those Polaroid-style photographs arranged in a gallery wall behind the lamp. The flowers cast a warm light on those pictures, and it looks like a cozy little corner of a cafe.
I spaced the colors unevenly on purpose. Two yellow flowers next to each other, then a coral one, then burgundy, then green leaves to break it up. Do not put them in a pattern. That looks like a craft fair. Let them cluster. A cluster of three in one spot, a solo bloom somewhere else. It mimics how real flowers grow. Throw a couple of leaves in between. The leaves are just chains with slip stitches, by the way. Super simple. I made six leaves and placed them randomly.
Soft Lighting Without the Hefty Price Tag
The final effect is hard to capture in a photo, honestly. The warm glow from within each flower creates these little pools of light that dance across the table surface. My wooden table has this worn patina, and the light catches the scratches and grain in a way that makes it look intentional. Like an expensive piece of decor from a boutique. But I spent maybe ten dollars total. And a couple of evenings while watching TV.
I keep this lamp on my dining table, but it would look amazing on a nightstand or a shelf. It is not bright enough to read by, if that is what you are wondering. It is ambient. It is for mood. When I have friends over, they always ask where I bought it. And I get to say, “Oh, I made it from trash basically.” That feels good. Not gonna lie. It feels really good.
Conclusion
If you have some leftover yarn and a spare set of fairy lights, you already have everything you need. Make a few flowers. Crochet a circle. Thread the lights through. Let it glow. It is one of those rare projects that looks complicated but is secretly simple. I would love to see your version if you try it. Tag me or leave a comment below. Honestly, the more handmade lamps there are in this world, the cozier everything gets.
#crochetflowerlamp #handmadelamp #budgethomedecor #diycozylighting #yarncraft
Leave a Comment