Why This Hatching Carrot Pouch Is a Perfect Easter Project
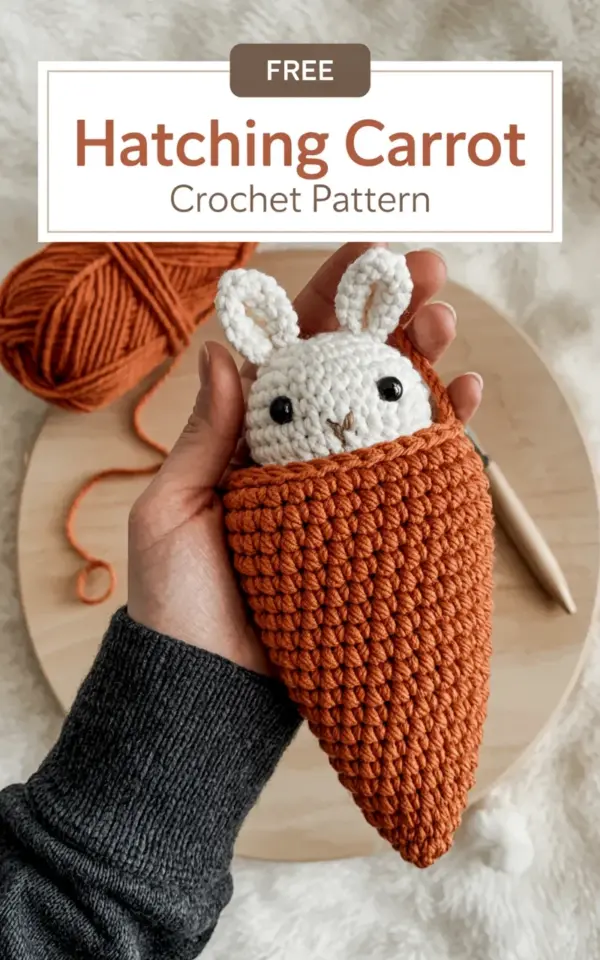
If you have been hunting for a free crochet carrot pattern that doubles as both a decoration and a gift, this hatching carrot pouch is exactly what you need. In the photos you can see a hand in a dark gray long sleeved sweater holding a textured orange brown carrot. Inside the pouch sits a tiny white bunny with black button eyes. The whole piece feels like a little surprise waiting to be opened. I love that it uses basic stitches so even if you are newer to amigurumi you can finish it in a weekend. And because I write this as a budget conscious crafter I have chosen materials that are easy to find without breaking the bank.
This pattern is especially fun for Easter baskets or baby shower gifts. The bunny peeking out of the carrot makes people smile immediately. You can keep the carrot closed with a simple button or a drawstring and let the recipient discover the bunny inside. The texture of the carrot comes from alternating back loop stitches and front loop stitches which gives that ribbed look without complicated techniques. I have made three of these now and each one took me about four hours total including the bunny.
Budget Friendly Yarn Choices for Your Carrot and Bunny
For the carrot you want a worsted weight yarn in two shades so you get that realistic gradient. I used Red Heart Super Saver in Pumpkin and Carrot. These cost around three dollars per skein and you will use less than half of each. For the bunny I recommend a smooth white acrylic like Bernat Premium or even a store brand. The key is to pick a yarn that shows the stitch definition clearly because the bunny is small.
Here is a quick list of what you will need without spending extra money on specialty fibers:
- Worsted weight yarn: orange brown (main), lighter orange (stripes), white (bunny), a scrap of brown for the carrot top.
- A 4.0 mm crochet hook (most amigurumi work well with this size).
- Two 9 mm black safety eyes or black buttons if you prefer a vintage look. Buttons are often cheaper and you probably have some in a jar at home.
- Polyester fiberfill stuffing. A single bag lasts for dozens of projects.
- Tapestry needle and stitch markers. A cheap set from a dollar store works fine.
If you want to be extra thrifty you can unravel an old sweater in the right colors and use that yarn instead. I have done that with a warm orange sweater and the texture turned out beautifully. The carrot in the photo has a slightly textured surface and that comes from the stitch pattern not from expensive yarn.
Basic Stitches You Will Practice
This pattern uses single crochet, increase and decrease. That is the foundation of almost all amigurumi. The carrot also uses a simple back loop only technique to create the ridges. If you have never worked in back loops it is easy: you insert the hook only under the back strand of the V on top of the stitch. That leaves the front loop free and makes a raised line. You alternate rows of back loop only with regular single crochet to get that striped carrot look.
The bunny is basically a sphere for the head plus a smaller sphere for the body. The ears are worked flat and then sewn on. The black button eyes in the photo are sewn with a strong thread but you can also use black safety eyes if you are making it for a child under three years old. For a truly budget option I have used small black beads from an old broken necklace and they look just as cute. Just make sure they are securely attached.
Saving Money on Notions and Stuffing Alternatives
Safety eyes can get pricey if you buy a whole pack. Instead check the button bin at a thrift store or ask grandparents if they have a button collection. Black two hole buttons are perfect because you can sew them on firmly and they give that classic doll look. The bunny in the featured photo has that exact style. You can also use a fabric marker to draw dots on a felt circle but I find buttons sturdier for a gift that will get played with.
For stuffing I use pillow filling from a craft store when it is on sale, but I have also cut up old tights or pantyhose into small pieces. That gives a firm texture and costs nothing. Just make sure the fabric is clean and lint free. The carrot pouch needs a little less stuffing than a normal amigurumi because it is meant to hold the bunny.
Assembly Tips: Getting the Carrot to Hold the Bunny
The carrot is worked from the top down in a tube shape. You increase at the bottom to create the wide end then stuff it lightly. The opening at the top is left unsewn so the bunny can sit inside. In the photo you can see the bunny peeking out with its ears sticking up. To achieve that you need to attach the bunny to the inside of the carrot with a few stitches so it does not fall out when the carrot is carried. I use a piece of yarn that matches the carrot color and sew the bunny body to the back wall of the pouch about a third of the way down.
For the orange brown stripes you change color every few rows. The pattern usually says to change at round 4, 8 and 12. I prefer to alternate every three rounds for a more subtle gradient. You can also add a little brown fringe at the top for the carrot leaves. In the picture the carrot has a small green leaf cuff that hides the opening slightly. That is just a chain loop sewn around the edge. It makes the pouch look finished.
Customizing for Baby Showers and Easter Baskets
This pattern works wonderfully as a baby shower gift because it is soft and interactive. You can attach a small rattle inside the bunny by putting a jingle bell inside a plastic Easter egg and stuffing it into the bunny body. That adds a sensory element without extra cost. For Easter baskets you can hide a chocolate bunny inside the carrot instead of the crochet bunny. Just make sure the pouch is deep enough and line it with a small piece of fabric if you want to keep the yarn clean.
I have also made a version where the bunny has floppy ears instead of standing ones. That required a different ear pattern but the same body and carrot. Use up scrap yarn for the ears if you want to test different looks. The budget friendly part is that you can make the whole set with leftover yarn from other projects. That is how I made my first one and it cost me exactly zero dollars.
Where to Download the Free Pattern and Share Your Work
The full free crochet carrot pattern is available as a PDF download on my site. It includes written instructions for both the carrot and the bunny plus a photo of the assembly steps. If you pin this project for your next crochet session you will have it ready when you need a quick gift. I also love seeing your versions. Tag me on Instagram or Pinterest so I can see your twist on the colors.
Remember that the hatching carrot pouch is meant to be fun and forgiving. If your bunny ends up a little lopsided or your carrot stripes are not perfectly even that just adds character. Use what you have on hand and enjoy the process. That is the real spirit of budget friendly amigurumi.
So grab your hook, pick a comfortable spot, and start stitching. This pattern will become one you come back to every spring because it is quick, cute and uses only basic skills. Happy crocheting.
#freecrochetpattern #crochetcarrot #amigurumipattern #eastercrochet #crochetbunny
Leave a Comment