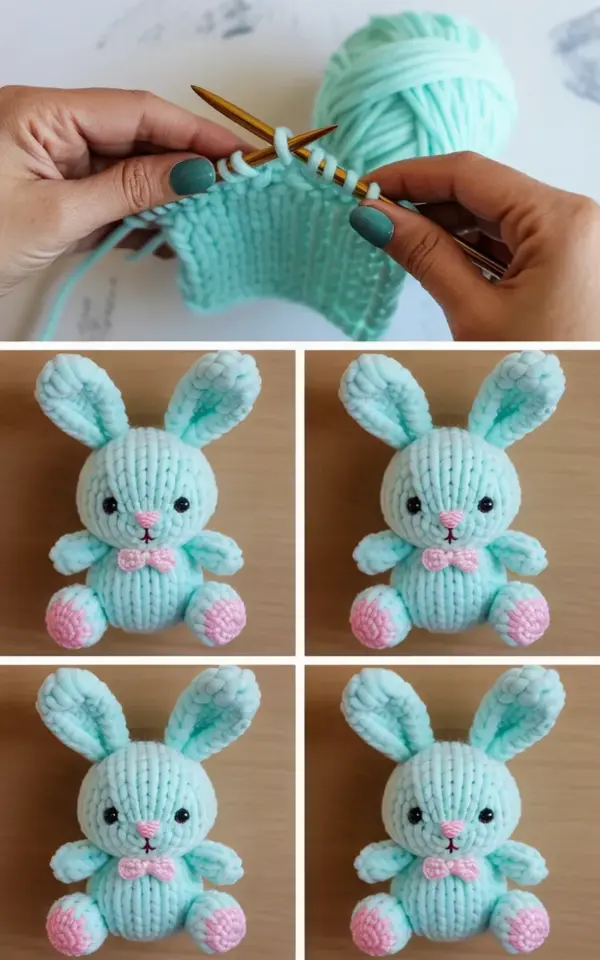
Knitting a little toy animal feels like a small magic trick. You start with a ball of yarn and two needles, and a few hours later, you have a personality sitting in your palm. This knitted bunny toy tutorial is for anyone who wants that feeling without spending a fortune on fancy supplies.
I wrote this specifically for the mint green bunny you see in the photo, the one with the ridiculously cute pink pom-pom feet. The whole project costs less than a takeout lunch if you shop smart. And honestly, it looks like you spent a lot more time and money than you actually did.
Let me show you how I made this little friend, from the very first stitch to that sweet embroidered face. The step-by-step photos really do help, especially when you are trying to figure out where to place the ears or how tight to pull the stuffing.
Why This Knitted Bunny Toy Tutorial Is Beginner Friendly
Look, I am not a patient knitter. I have started and frogged more sweaters than I care to admit. So when I say this pattern is doable, I mean it is actually doable for regular humans.
The toy is built from simple shapes. You knit rectangles and squares, fold them, sew them up, and stuff them. There is no complicated shaping with short rows or tricky increases that make you want to cry.
You just need to know the knit stitch. That is the whole secret.
If you can knit a basic square, you can make this knitted bunny. Beginners should feel confident jumping in because the construction is very forgiving. If your tension is a bit loose or a little tight, the stuffing hides a multitude of sins.
The photo above shows the finished product from different angles in that grid below the hands. The structure is simple, but the details make it look professional. Trust me, the pom-pom feet do a lot of heavy lifting in the cuteness department.
Gathering Your Materials on a Budget
Here is where a lot of hobby blogs lose me. They recommend specific brands of yarn that cost fifteen dollars a skein and needles that look like they belong in a museum.
That is nonsense. You do not need any of that.
For this mint green bunny, you need worsted weight yarn in a light green color. I found a perfectly good skein at a craft store for about three dollars. You also need a tiny bit of pink yarn for the nose and some darker thread or yarn for the eyes.
The gold knitting needle in the top image is just a standard size four or five needle. Gold colored aluminum needles are cheap and work great. You do not need fancy wooden ones, though those are nice if you have them.
Here is the full list of what I used:
– One skein of mint green worsted weight yarn (any budget brand works)
– A small amount of pink yarn for the nose and pom-poms
– Dark brown or black embroidery floss for the face
– Two wooden buttons or safety eyes (or just embroider the eyes like I did)
– Polyester stuffing, which you can buy for a few dollars or salvage from an old pillow
– A yarn needle for sewing everything together
– Two gold knitting needles in size US 4 or 5
The pink pom-pom feet are the signature detail. You can buy a small pom-pom maker for a couple of dollars, or you can use cardboard cutouts in two different sizes. I used a homemade cardboard template because I am cheap and it works exactly the same.
Instructions for Knitting the Main Body Pieces
Before you cast on, decide if you want the bunny to be light blue or actually mint green. The photo shows a light blue bunny, but the title says mint green. Honestly, either color works. Pick whatever green or blue you love.
Start by casting on enough stitches to make a rectangle. For a small bunny, cast on about twenty stitches.
Knit in garter stitch until the piece is roughly square. Garter stitch creates that bumpy, textured knit pattern you can see in the finished product photo. It is just knitting every row, no purling needed.
This is the most relaxing part of the entire project. You can do this while watching a show or listening to a podcast. The repetitive motion is genuinely calming.
Make two smaller rectangles for the arms. Make two even smaller ones for the ears. Do not worry about being precise.
That is the best part about this knitted bunny toy tutorial. You are not building a precision machine. You are building a snuggly friend with a slightly handmade charm.
Assembling the Bunny: Sewing and Stuffing the Body
Ok so here is the part where most beginners get nervous. Sewing the pieces together seems scary, but it is not.
Fold your main square in half to create a pocket. Use your yarn needle to sew up the sides, leaving the top open.
Turn it right side out and stuff it firmly. I like to use a pencil or a chopstick to push the stuffing into the corners. A blunt chopstick is perfect for this.
Here is a useful tip: stuff the body less than you think you should. If you overstuff, the fabric stretches and looks lumpy. The finished bunny in the photo has a nice, soft squashiness to it.
To make the legs, pinch the bottom corners of the stuffed body and sew a small line across each corner. This creates little rounded feet. It is a simple trick but it makes a huge difference in the shape.
Creating the Pink Pom-Pom Feet and Details
Now for the famous pink pom-pom feet. These little balls of pink fluff are the reason this bunny stands out.
You can make them with a pom-pom maker or use the cardboard method. Wrap pink yarn around the ring until it is thick and fluffy. Cut around the edge, tie a tight knot in the middle, and trim the excess.
I am not going to lie, the first pom-pom I made looked like a sad little cloud. But after a quick trim with scissors, it rounded out nicely. Do not be afraid to trim aggressively.
Sew one pom-pom to each bottom corner of the body. Position them so they stick out slightly to the front. This gives the bunny that sitting-up pose you see in the photo grid.
The small pink bow tie adds a charming finishing touch. You can make one from a scrap of ribbon or knit a tiny bow. I used a piece of pink ribbon I found in my craft drawer. It took five seconds to tie.
How to Embroider the Face for the Perfect Sweet Expression
The face makes or breaks the bunny, no pressure. But here is the secret: simple is better.
Use dark brown embroidery floss for the eyes. Make two small horizontal stitches for closed, peaceful eyes. This creates a sweet, sleeping expression that is perfect for a baby gift.
For the nose, use the pink yarn. Make a small triangular shape by sewing a few short stitches in a little “V”.
Do not make the eyes too big or too close together. The bunny in the photo has a relaxed, tranquil face. Leave some space between the eyes and the nose.
Here is a helpful tip from my experience: place the face features lower on the head than you think. When you add the ears and the body, the head will look differently. Lower features create that classic cute baby look.
Final Assembly: Attaching Ears and Head to the Body
Fold the small ear rectangles in half lengthwise and sew them shut. This creates long, narrow ears that stand up nicely.
Sew the ears to the top of the body. Play around with the positioning first. Some bunnies look better with ears that flop to the side, others look better straight up.
The bunny in the photo has upright ears that proportionally fit its head. Place them about an inch apart so there is room for the head structure.
To make the head, you simply stuff a smaller square pouch and attach it to the top of the body. Honestly, this is how many amigurumi patterns work, just little pouches combined.
Sew the head on securely with a few passes of yarn. Make sure it is attached firmly if this is a gift for a baby. The last thing you want is a flying head incident.
Finishing Touches and Gift-Giving Ideas
Once the head is on, your knitted bunny is essentially complete. Give it a gentle squeeze and adjust the stuffing if needed.
This handmade bunny makes an excellent baby shower gift. It is soft, washable, and free of small parts if you embroidered the eyes instead of using buttons. The soft pink pom-pom feet are fun for little fingers to explore, though they are sewn on tight.
If you want to make a set, knit a slightly larger one using the same pattern. The color variations are endless. I have thought about making one in a sage green with cream pom-poms, and maybe one in a soft lavender.
For a cozy weekend project, this is perfect. You can realistically finish the whole bunny in one sitting if you binge a movie. It is one of those projects that gives you immediate satisfaction.
I hope this knitted bunny toy tutorial gives you the confidence to try it. We all need a little more handmade softness in our lives, and this little guy delivers. Save this for your next knitting day, and tag me when you finish yours. I love seeing the creative color choices you come up with.
Leave a Comment