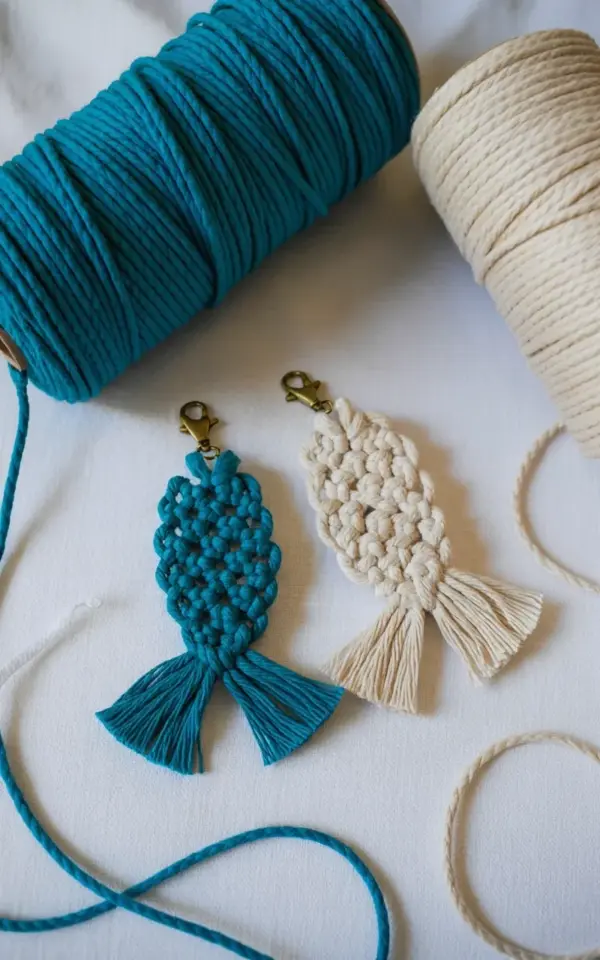
If you have been hunting for a macrame fish pattern that doesn’t flop or unravel, this teal and cream keychain project is the one. I have made about thirty of these little fish over the past year, and they actually hold their shape. The photo above shows the two I made for my sister: a bright turquoise fish and a natural cream one, both hanging off brass lobster clasps on a white cloth. The best part? The whole thing costs less than a dollar per keychain if you buy the right cord.
Why This Macrame Fish Pattern Actually Works
Most macrame fish tutorials I tried ended up looking like lumpy caterpillars or flat pieces of seaweed. Not these. The trick is using a very thick cord, not the skinny string that snaps or bends in weird directions. That teal and cream pair in the picture? They stand up, hold their shape, and feel solid in your hand.
I also love how the bright turquoise pops next to the natural cream. The contrast is simple but cheerful, and it makes the fish read as a fish even from across the room. Honestly, that was my whole goal. Nobody wants to say “oh, cute… is it a snake?”
So here is a budget-conscious guide to making these little guys, with real options that won’t break your wallet.
Choose Your Cord Without Spending Much
You do not need expensive branded macrame cord for this. I got my turquoise roll from a discount bin at a local craft store for about three dollars, and the cream cord was from the same place. The photo shows a third roll of natural-colored cord peeking in on the right edge, which is exactly what my spares look like when I buy in bulk.
Look for 3mm or 4mm single-strand cotton cord. If you can’t find that, try clothesline rope or braided nylon cord. The important thing is that the cord is thick enough to keep the fish body stiff. My two fish in the photo are made from a roll that is noticeably chunky, and that is why they don’t sag.
A 50-yard roll makes around ten keychains, sometimes twelve if you cut your lengths carefully. That’s less than fifty cents per fish in cord alone.
Tools and the Brass Lobster Clasp
You really only need a few things:
- Scissors (any decent pair works)
- A tape measure or ruler
- A lighter or a dot of glue to seal the cord ends
- One brass lobster clasp per fish, or you can reuse old keychain hardware
The brass lobster clasp in the photo is not just for show. It turns the macrame fish into a functional keychain, which means the craft actually gets used. I like the warm brass color against the cool teal and the neutral cream. It feels more like jewelry and less like a summer camp project.
If you have a pile of broken keychains in a drawer, steal the clasps from those. That brings the total cost down to nearly zero.
How to Tie the Fish Body (Step by Step)
Here’s the basic method I use. Cut a piece of cord about 1.5 yards long. Fold it in half to find the middle, then make a loop there for the lobster clasp. Secure the clasp to the loop and start knotting the fish body with a simple series of square knots or half hitches. If you are new to the knots, just practice until the tension feels even.
For the tail, let the remaining strands spread into a small fan, then trim them into a V shape. The picture shows the cream fish with a slightly wider tail than the teal one. That was a happy accident, and it still looks good.
Tie the knots tightly, but not so tight that the cord twists. You want the fish to have a smooth, rounded back. The thick cord helps here because it fills out the shape naturally. My first teal fish took me about fifteen minutes. By the fifth one, I could finish in eight.
Keep Your Fish From Going Floppy (My Best Tip)
Everyone asks how I get the shape to stay. Here is the honest answer: the cord thickness does most of the work. But you also need to pull each knot snugly and then pinch the fish between your fingers as you go. That little squeeze sets the curve of the body.
One weird thing I learned: if you leave the fish near a warm window for a day, the cotton cord seems to settle even more. I left one on my car dashboard last summer by accident, and it still looks fine. No melting, no sagging. I can’t promise that for every cord, but the thick cotton rolls are surprisingly sturdy.
And if your fish does get a little floppy? Just mist it with water, reshape it, and let it dry flat. It snaps back into place.
How to Make a Whole School of Fish Without Breaking the Bank
This project is perfect for gift giving. I made a batch of six as birthday gifts for my coworkers, and the cord cost me less than a coffee. The brass clasps cost maybe four dollars for a pack of ten online, and that was the priciest part.
To speed things up, cut all your cords before you start knotting. Stack them together with a rubber band so they don’t tangle. Then work assembly-line style: tie the loop, add the clasp, knot the body, trim the tail. Before you know it, you have a whole school of fish.
The cream fish in the photo is actually the exact one I gave to my sister, and the teal one is mine. She’s not into handmade stuff, but she asked for a second one. That’s the best review I can get.
If you want to make them even cheaper, skip the brass clasps and just attach the fish to a plain key ring. Or punch a small hole in the tail and thread the ring through that. Either way, you still get a cute fiber art piece that takes ten minutes to make.
Ok, so that’s the whole project. No fancy tools, no fancy cord, just a few knots and a little attention to thickness. If you try it, I’d love to see your version, especially if you pick a color combo I hadn’t thought of. Grab some cord and make a couple for the people you like.
#macramefish #macramekeychain #macramecrafts #diykeychain #fiberart
Leave a Comment