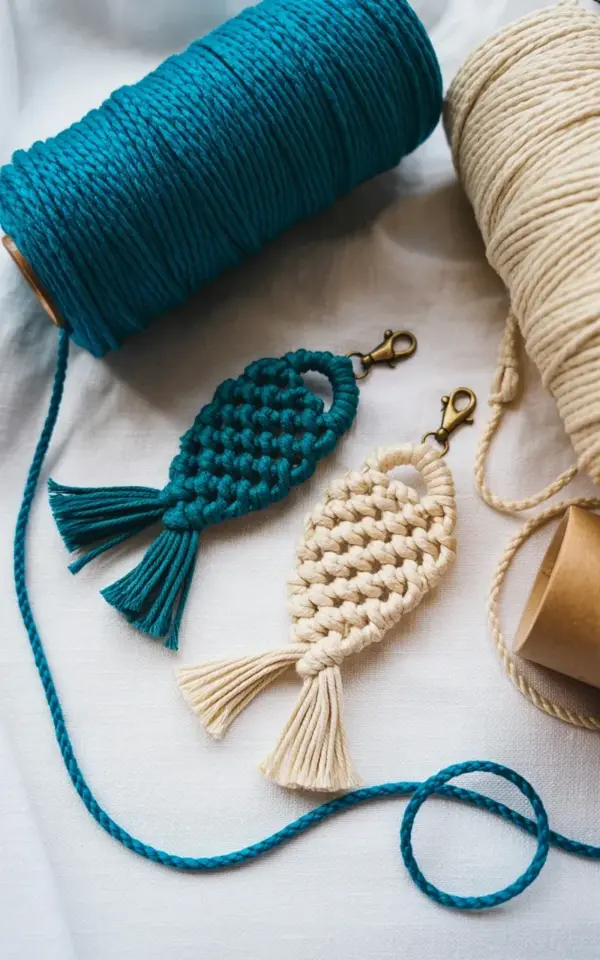
Look at the photo for a second: two little fish, one teal and one cream, resting on white fabric. The teal one has that thick, glossy cord that practically glows against the cotton rope beside it. The cream one looks softer, more understated, like something you’d find in a natural-fiber basket. This macramé fish keychain tutorial is meant for total beginners. Honestly, if you can tie your shoes, you can handle this.
I’m going to walk you through every step, from supplies to that satisfying final click of the lobster clasp. And I’ll point out exactly what’s happening in the photo, because those two fish are the perfect example of how different the same pattern looks in different cords.
Macramé Supplies You’ll Want to Gather
Before we tie anything, let’s talk about what’s actually in the photo. You’ve got a deep teal cord, a natural-colored cotton rope, and a small brass lobster clasp. A third roll of natural cord peeks in from the right edge, just in case you run out or want to make a second fish. That’s pretty much the whole shopping list.
Here’s what you need:
- Thick teal cord (about 3-4 mm, the kind that doesn’t flop around)
- Natural cotton rope (same thickness, or slightly thinner)
- One brass lobster clasp (small, like 15-20 mm)
- Scissors (sharp ones, not the dull kitchen pair)
- A tiny drop of clear glue or fray check (optional but helpful)
You can find these macramé supplies at any craft store or online. The thick teal cord is the star here. It holds its shape well and makes the fish look chunky and intentional. The natural rope is softer, which is why the cream fish in the photo has a slightly more relaxed, fuzzy vibe.
How to Cut and Prep Your Cord
For one fish, you’ll need two pieces of cord. Cut one piece about 10 inches long. That’s the spine of the fish, it runs through the middle and gives the shape some structure. Then cut a second piece about 24 inches long. That’s the wrapping cord that creates the fish’s body.
Before you start cutting, wrap a small piece of tape around each end of the cord. This stops the fibers from unraveling while you work. It’s a tiny step, but it saves you from that annoying frayed mess halfway through the project. I learned that after making one fish with untaped ends and spending ten minutes fixing the fuzz.
If you’re using the natural cotton rope, the ends will try to untwist the second you cut them. The tape trick matters even more there.
The Only Two Knots You Need to Know
You don’t need a binder full of macramé knots for this project. Just two. Honestly, that’s the beauty of it. The first is a lark’s head, and the second is a half hitch.
Here’s how you tie a lark’s head: fold a cord in half, place the folded loop under or over another cord, then pull the two loose ends through the loop. Pull tight. That’s it.
A half hitch is even simpler. You just take one cord, wrap it around the spine cord, and pull through a loop. It’s basically the same motion as tying the first half of your shoe lace. The half hitch is what creates those little ribbed segments along the fish’s body. In the photo, you can see those subtle ridges on the teal fish. Each ridge is one half hitch.
Tying the Fish Body, Step by Step
Grab your 10-inch spine cord and fold it in half. Slide the folded end through the ring on the brass lobster clasp. Then pass the two loose ends through that loop and pull tight. You’re basically doing a lark’s head around the clasp, but the clasp is your anchor instead of another cord.
Now take your 24-inch wrapping cord. Fold it in half and tie it around the spine cord with another lark’s head, right below the clasp. You’ll have four loose ends hanging down. Don’t panic. That’s normal.
Now you start making half hitches. Take the left wrapping cord, bring it across the front of the spine cords, and wrap it around the back. Pull the end through the loop. Tighten. Do the same with the right cord. Alternate sides, left and right, wrapping around the spine as you go down.
As you work, the body starts to fill out. The teal cord in the photo creates a solid, rounded shape because it’s thick enough to sit tightly against itself. The cream fish looks a little airier, which is just the nature of the softer rope.
Here’s the thing: for the fish shape, you should make slightly looser hitches near the middle of the body, then tighten them up again near the tail. That gives you a bulge in the middle, like a fish’s belly. It’s not an exact science. Just eyeball it.
Adding the Brass Lobster Clasp
The clasp goes on first in the step above, but there’s a second option. You can tie the entire fish body first, then attach the clasp at the end. The photo shows the clasp already attached to both fish, sitting right at the tail end. That’s the easier way, actually.
If you want to add the clasp last, just leave a small loop at the top of your spine cord before you start the half hitches. After the body is done, slide the clasp through that loop and pull the cord tail through to secure it.
The brass lobster clasp is small and shiny, and it pops nicely against the matte cotton cord. It’s also a practical touch. You can hook this thing onto a bag, a set of keys, or even a zipper pull. The little metal click when it closes is unreasonably satisfying.
Why Thick Teal Cord and Natural Cotton Rope Work So Well
I’m a bit biased toward the teal one in the photo. That bright turquoise color against the plain white background is eye-catching. But the cream fish has its own quiet appeal. They look like two different species, one tropical, one coastal.
The texture difference matters too. Thick teal cord
Leave a Comment