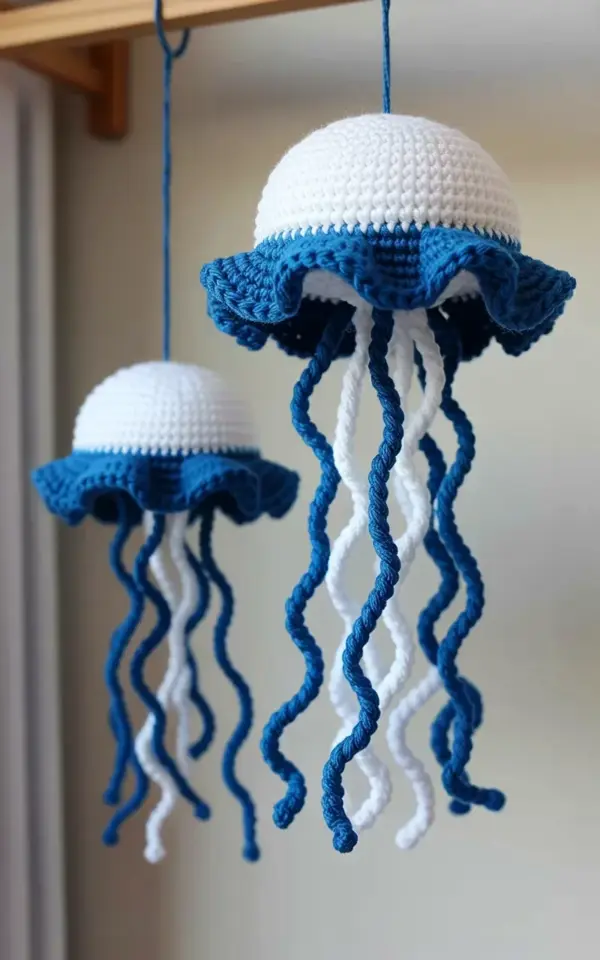
There is a photo of two crochet jellyfish floating on my phone that I keep coming back to, and honestly, it has completely derailed my planned crafting schedule for the week. I meant to be working on a simple granny square blanket, but here we are, surrounded by skeins of white and royal blue yarn. These crochet jellyfish are officially my favorite summer craft right now, and if you have a beach nursery or a baby shower on the calendar, you need to see what a few rows of stitches can do.
The photo that got me is deceptively simple. Against a soft light gray wall, two jellyfish hang from invisible strings, looking like they just drifted in from a tide pool. The one on the left has a white umbrella with a blue ruffled edge, and its tentacles twist and curl downward like ribbons in a current. The one on the right is a little show-off, with longer tentacles that spiral and trail into elegant waves. They’re not overly complicated to make, but the effect is genuinely striking. It’s the kind of project that looks like it took way more effort than it actually did, which is the sweet spot for a handmade gift.
I made mine using a simple worsted weight acrylic because, let’s be real, babies are messy and you want to be able to toss this in the washing machine. I love the look of cotton for the texture, but for a nurseries, durability wins. The color contrast is doing all the heavy lifting here. The crisp white against that deep royal blue just pops against a neutral wall, making it feel both oceanic and modern.
## Why a Crochet Jellyfish Pattern Works for a Beach Themed Nursery
So here’s the thing about ocean themed nurseries, they can go really tacky really fast. You get these mass-produced cartoon fish and plastic anchors on the wall, and suddenly the room looks like a budget carnival. A crochet jellyfish avoids all that entirely. It brings in the ocean theme without the kitsch.
Jellyfish are also one of the most forgiving shapes to crochet. If your tension is a little wonky or your stitches aren’t perfectly even, it honestly just makes the tentacles look more organic. There’s no shaping to fight with, no sleeves to set in, no corners to count. You basically make a dome, add some ruffles, and then attach a whole bunch of hanging strands. Miscalculated your tentacle length? Great, now it looks like an especially dramatic jellyfish.
They hang beautifully in a corner of a crib or over a changing table. Out of reach of little grabbing hands, obviously, since we want them as decor and not as a chew toy. The silhouette is soft and whimsical, but it still feels intentional. It reads as “curated” rather than “carnival.”
## Selecting the Perfect Summer Craft Yarn Colors and Textures
Ok so let’s talk yarn for a second, because I have opinions. For this specific wave pattern, you really want a yarn with clear stitch definition. A fuzzy mohair might feel dreamy, but it will turn your jellyfish into a blurry blob and you will lose all those lovely ruffle details.
I reached for a medium weight yarn in a stark white and a high contrast royal blue. You could do a pastel pink and mint combo for a softer vibe, but for that crisp beach look, the white and blue is the winner. That deep, saturated blue feels like the deeper water just past the shoreline. It’s more dramatic than a baby blue.
Here’s a quick list of what I considered before committing to the acrylic, and maybe it helps you pick your own stash:
– **Cotton yarn** for a matte finish and a bit more weight on the tentacles.
– **Acrylic yarn** for machine washability and a softer, fluffier drape.
– **Cotton blend** if you want a middle ground between structure and softness.
– **Bernat Blanket** type yarn if you want HUGE jellyfish that take up half the wall.
The white part of the jellyfish is the “bell” body. I used a solid white, but honestly, a variegated white with subtle gray streaks could look stunning against the right wall. The royal blue is used for the fringe and the ruffle. You want a blue that is deep enough to see the texture against the white when they hang side by side.
## Step by Step Guide to Creating the Crochet Jellyfish
I’m not going to write out a full pattern here because there are a million free patterns floating around that are better than anything I could transcribe. What I will tell you is the basic anatomy of these specific jellyfish in the photo, so you can identify the right pattern when you see it.
Start with a magic ring, and increase in single crochet to form a flat or slightly domed circle. You want the dome to be about the size of a small grapefruit or a large orange. Once you hit the diameter you want, you stop increasing and just work even for a few rounds. This creates the side of the bell.
For the ruffle edge, you want to incorporate the blue yarn. Usually, you do a round of increases, like two double crochets in every stitch, and then you do a scalloped edge on top of that. The photo shows a soft, wavy ruffle, not a super crisp picot edge. Look for a pattern that specifically mentions “scallop” or “wavy” to get that effect. Honestly, you could do a thick foundation chain and then a shell stitch, and you’d get a very similar look.
The tentacles are the fun part. Cut long strands of blue yarn, maybe 24 to 30 inches each. Fold them in half, and use a hook to pull the loop through the underside of the bell. Then pass the ends through the loop and pull tight. For a curl effect, use a crochet hook to pull the strand across a sharp edge. I hold the yarn against the edge of a ruler and pull the hook firmly along it. It kinks the fibers and makes them twist and wave. That is exactly how the spirals in the photo on the right are made.
## How to Hang Crochet Jellyfish for a Nursery Display
You can’t just pin these things to the wall with a thumbtack and call it a day. They will spin around and annoy you. Find a few tiny eye hooks or use clear command hooks designed for small frames. I hate using adhesive strips on paint, but these little clear hooks work if you use the exact right weight.
Cut a piece of clear fishing line or a thin nylon cord. Tie one end to the top of the jellyfish bell, being sure to hide the knot under the shell stitches. Then, tie the other end to your hook. Make sure they are at varying heights. Having them all at the same level looks like you just hung wet laundry. You want them to look like they are drifting through the water.
The photo shows them against a gray wall, which is a great backdrop because it mimics the shadows of an ocean floor. If your nursery has a lighter wall, consider using a brighter blue yarn to ensure the tentacles are visible. The strings disappear against the gray wall in the picture, which makes it look like they are literally floating in mid-air.
## A Handmade Baby Shower Gift Idea Worth Stealing
Look, everyone brings a blanket or a onesie to a baby shower. The room is filled with practical gifts that get used for a few months. If you want to give the parents something they will actually hang on the wall and keep, this is it. A crochet jellyfish displays like a piece of nursery art, but it has the handmade charm that a print from Etsy lacks.
I made a set of three for a friend’s baby shower last summer, and the mom cried. Obviously, the hormones were doing some work there, but she specifically said it was the first gift that felt like it was actually about the “feel” of the room instead of just practicality. It’s an heirloom item, in a way. A plastic toy gets donated, but this yellowed slightly and kept its shape, and she’ll probably keep it in a drawer forever.
If you are giving it as a gift, don’t add a strong scented sachet or fabric softener. Just hand wash it with a drop of baby soap, let it air dry, and wrap it in tissue paper. It’s a summer craft that feels like you spent a fortune on a boutique decoration, but in reality, you just spent a few evenings watching TV and doing something with your hands.
## Easy Summer Craft Project for Crochet Enthusiasts
This is the perfect mindless summer project. Summer is for being outside, having people over, and not sitting in a chair staring at a complicated chart. This jellyfish is not that. You can make the entire body while sitting on a porch swing, listening to the neighbors argue about property lines. The tentacles require a little more attention because you are cutting and attaching a dozen strands, but the crochet itself is highly repetitive.
It takes me about two hours to make a single jellyfish, maybe a little less if I am using bulky yarn. The one on the right, with the longer tentacles, takes just a little more time because you have to cut longer strands and run them through the kinking process. It’s a great way to use up small scraps of white yarn you have lying around.
So if you are looking for a way to scratch that summer craft itch without committing to a giant afghan, give these a try. Save the little pixel preview on your phone to look at the shape of the bell and the way the tentacles flow. Remember, every jellyfish is different, just like the real ocean, so your version is guaranteed to be perfect.
I hope this whole post has convinced you to make one or seven of these. They are quick, forgiving, and come with a built-in appreciation factor. Find a good pattern, grab a cup of coffee (or something stronger, since it’s summer), and make a couple for your space or as a handmade baby shower gift. If you do, tag me, I want to see how the colors look in your room.
Leave a Comment